2006/09/29

[筆記]弄懂材質--合成材質篇(composite)

3ds max當中有很多種材質與貼圖都與合成有關 名子也很像 容易混淆 這裡特別做比較說明:


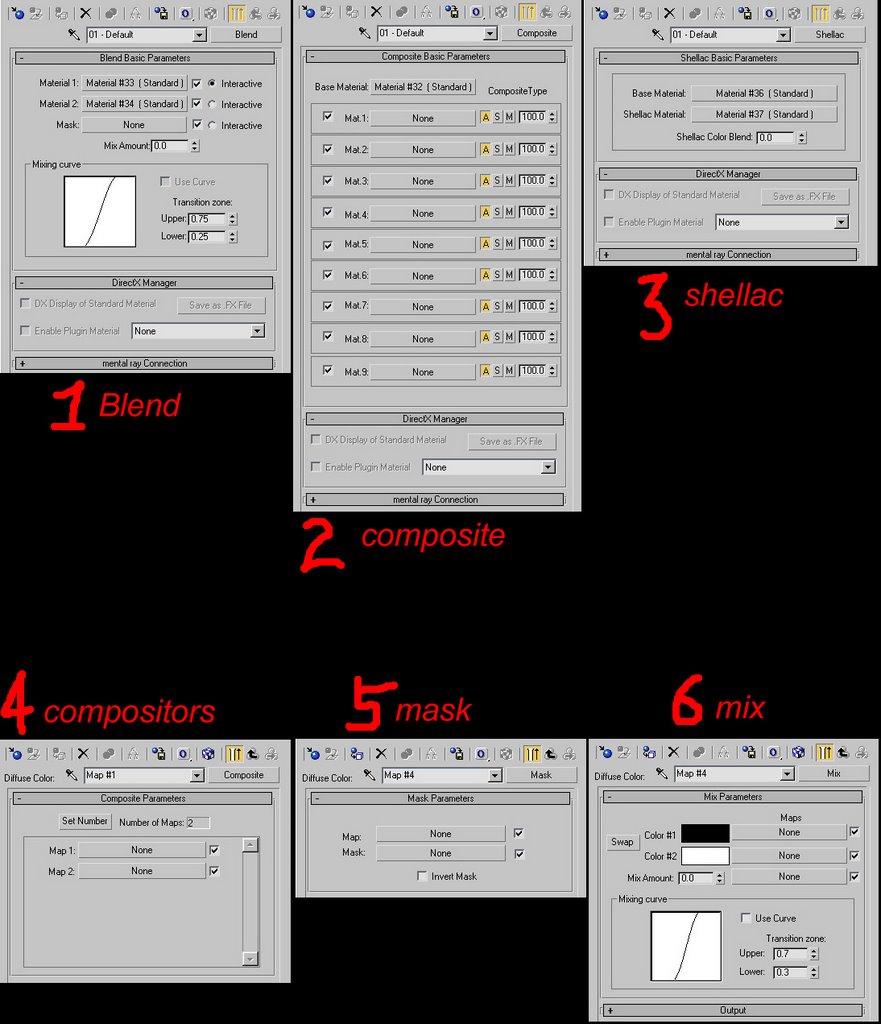
1~3是材質material 4~6是貼圖map. 材質與貼圖的差異 前篇以介紹過了. 這六種材質/貼圖都與影像合成有關 如果弄懂了 應該對材質觀念有幫助.

首先是2與4非常像 compositor與composite 兩者都是合成的意思 不同的是一為貼圖 另一為材質. 解釋2的意義: 其base material就是底層材質的意思 其上的材質Mat1, Mat2...可以依序疊加. 這裡的Mat2等 一定要加上透明度(mask)這樣base的材質才會顯現 否則覆蓋過後只剩下mat2等疊加的材質能夠被看到. 合成的方式有a (addictive), s (substrative), m (mix)三種 這裡a的方式是最直觀的. 簡單的說就是 composite材質即為底層材質 然後疊加新的材質上去 (玩過photoshop的圖層就很容易理解).

材質的合成能夠建立像是 塑膠+玻璃等混合物體 然而貼圖的合成辦不到.

而4是compositor真的和2很像. 差別在於4適合成貼圖 而其map2的貼圖必須要有alpha等透明度設定(tif檔) 否則map2會把map1所覆蓋.

1blend材質 這裡mat1相當於base material 而mat2覆蓋上去, 由mask控制mat2的覆蓋程度 換句話說mask是加諸在map2之上的 如果mask當中是黑色 則材質顯露出mat1的樣子 而mask是白色 則顯示mat2的樣子.

與belnd很類似的是shellac材質 差別在於 shellac的材質base與shellac材質之間有上下之間的關係 而blend材質的mat1 與mat2是混合而已 沒有上下的關係.

5mask 這個貼圖通常不會單獨使用 (通常會與composie material搭配) 這裡map1 相當於之前介紹的map2貼圖 而mask是加諸於map1之上的 那你會問mask的base材質為何? 就是diffuse color而已. mask適合做為一物體上面貼貼紙的作業上.

6mix, 這個又和blend幾乎一模一樣了 差別就是一個為材質 一個為貼圖而已.


舉例:


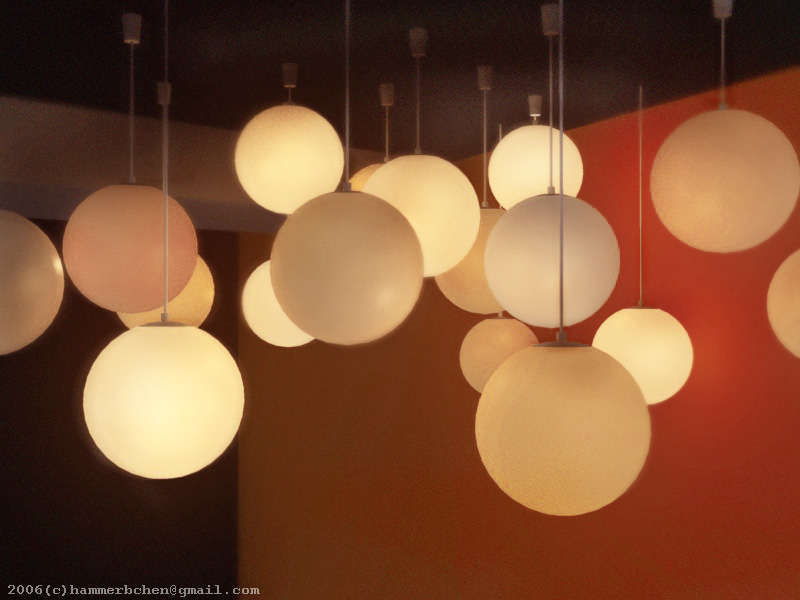
想像一下你有三張投影片 一張印有綠樹 一張是紅蠟燭 一張是人群(黑色代表透明) 這裡你把綠樹放在底下(base) 疊上一張紅蠟燭 然後再用人群去遮蓋紅蠟燭 就會得到圖像3

如果改遮蓋程度為50% 就會得到圖像4

3ds max材質最難理解的就是合成 影像合成的概念也不過是如此.
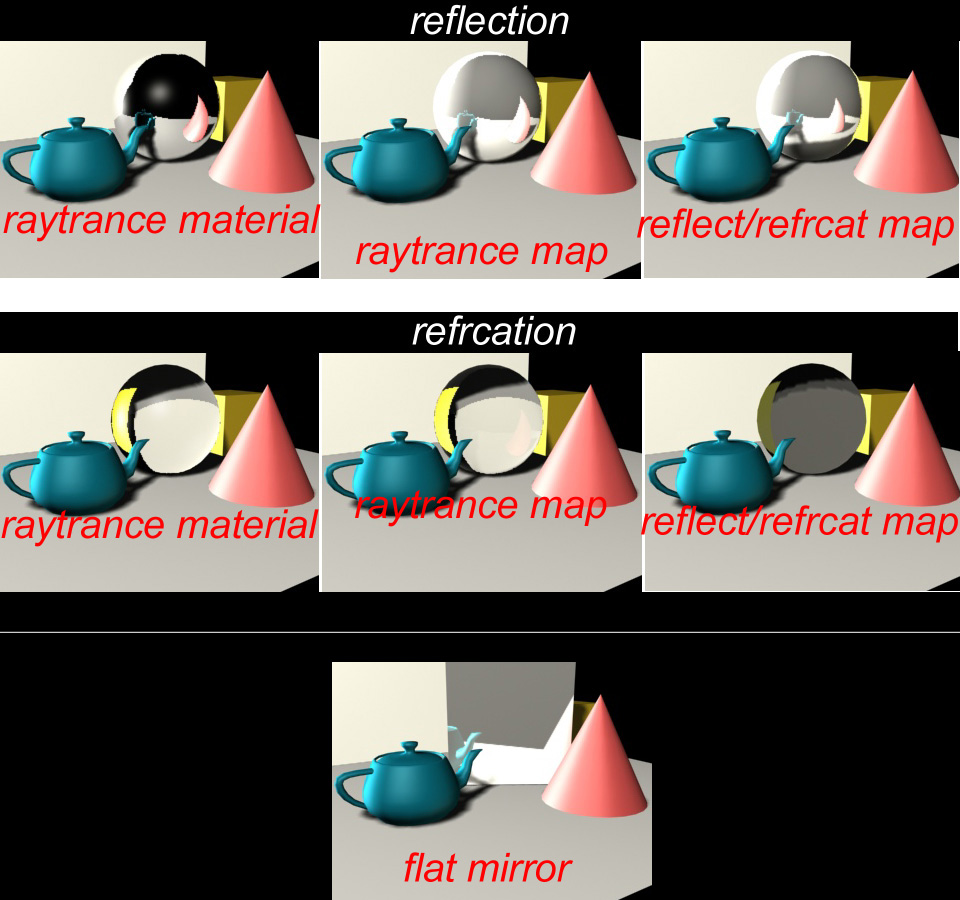
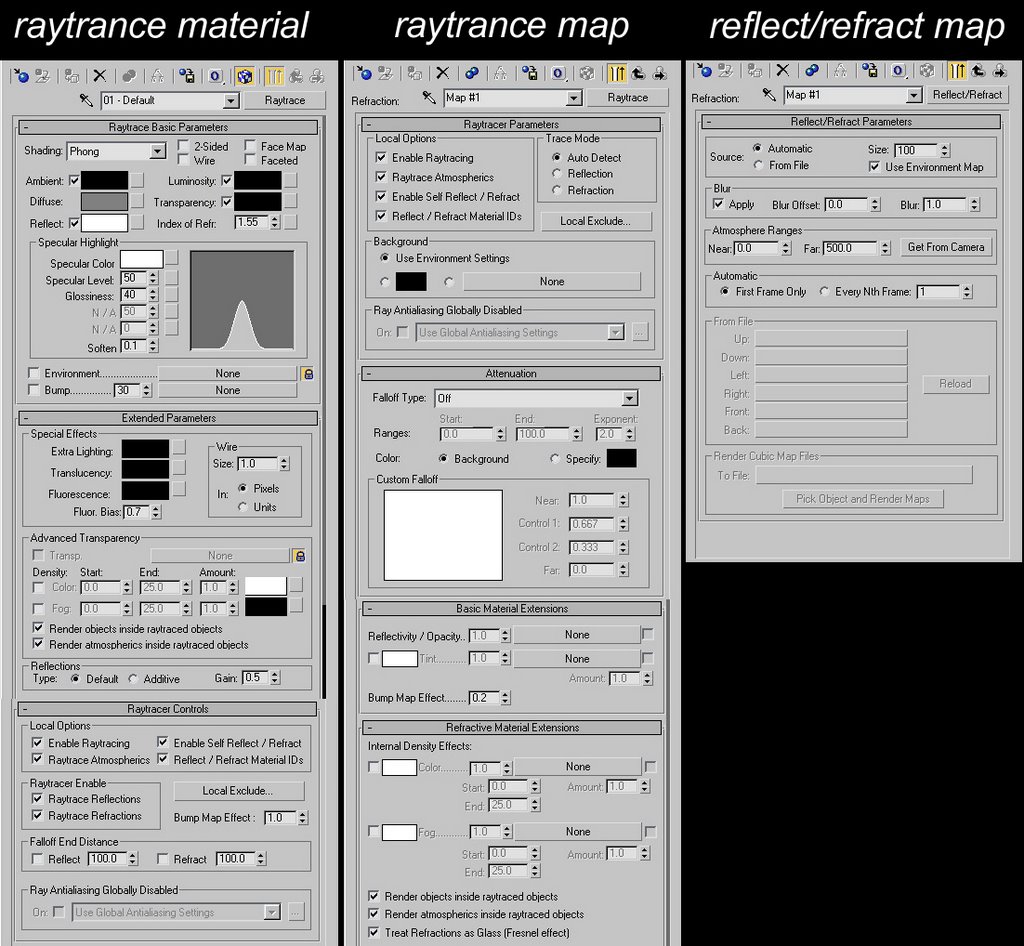

[連結]
弄懂材質--反射折射篇
[連結]3分鐘學會使用3ds max內建的全局照明

[筆記]弄懂材質--反射折射篇 reflect/refract material and map

想要徹底弄懂材質 於是打算做一系列的比較 藉由比較各種材質貼圖 徹底了解其參數的意義與限制. 在3ds max當中要建立反射 折射(reflect and refract)的材質 有很多種方法 這裡介紹至少有3種方式 7種結果. 可以用raytrance material與map來解決: 問題是到底什麼是材質(material) 與貼圖(map)呢?

我個人的理解是 材質如塑膠 金屬 玻璃等都算是材質. 在3ds max當中如果物體給予了玻璃材質 那個物體整體就是玻璃的材質. 而相對的貼圖而言 貼圖是一張圖片貼在物體表面 呈現出物體的樣子.

一個材質可能包含多種貼圖 但是一個貼圖就只能是某個材質 因為貼圖是材質的子集合. 簡單的說 貼圖是貼在材質之上的. 你可以用不同的材質建立不同性質的質感 例如混合塑膠與玻璃材質 但是你沒辦法混合塑膠與玻璃貼圖 建立兩種質感 因為貼圖就是貼圖 無法同時表現兩種質感.

想像一個圓柱體 你可以給予玻璃材質 那圓柱體看起來就會像是玻璃; 如果你不給予玻璃材質 而是利用像機去拍攝真的玻璃 然後把玻璃的影像印刷出來 把印刷的照片貼在那個圓柱體上 如此一來 乍看之下 那個貼有玻璃相片的圓柱體 看起來也像是玻璃了.

這就是貼圖與材質最大的差別. 簡單的說 貼圖可以算是一種取巧的方式. 跟玻璃材質比較 玻璃貼圖的方式是比較有效率多了 但是其結果卻是不夠真實.

再舉一個例子 室內裝潢有錢人就會用實心木板 沒錢的就用三合版. 三合版是用木屑擠壓成行的版子 外層可以貼圖(map) 看你是要花梨木 就貼花梨木的貼圖 要柚木就貼柚木的貼圖. 而實心木板就是直接用花梨木 或是柚木的木料. 三合板比實心木便宜許多 如果說三合板就是貼圖(map) 而實心木就是材質(material) 那也是很貼切 因為三合板比實心木便宜 而map也比material運算的快的多.

這裡比較三種方式建立反射/折射的效果
1. 用raytrance material 將reflect改為全白 這樣物體就會呈現反射

2. 用raytrance material 放置在refelct map 這樣物體就會呈現反射

3. 用reflect/refract map 放置在refelct map 這樣物體就會呈現反射

4. 用raytrance material 將transparency改為全白 這樣物體就會呈現折射(透明)

5. 用raytrance material 放置在refract map 這樣物體就會呈現折射(透明)

6. 用reflect/refract map 放置在refract map 這樣物體就會呈現折射(透明)

7. 最後一種方式 但是只能用在平面上 就是用flat mirror放置於refelct map

8. 補充: 若是要折射的話 還可以用thin wall reflection


比較一下這些不同方式 可以看出raytrance material的效果是最好的 而用map方式呈現的反射或折射 結果會太白

比較一下三種方式的介面:


可以發現複雜度 是raytrance material>raytrance map>refelct/refract map

簡單說明一下: raytrance material有很多選項. 而raytrance map也不見得就比raytrance material差, 因為raytrance map具有attenuation的選項. 看看reflect/refrcat map介面相當簡單, 它的原理就是建立一個cubic map貼在物體的六面 產生折射與反射的錯覺 這裡size:100 就是指貼圖的解析度. 如果你不想即時建立cubic貼圖 可以事先建立六面貼圖, 軟體會運算所指定的物體 產生六張解析度為100*100的貼圖供你使用.

[連結]弄懂材質--合成材質篇

2006/09/24

[資源]免費城市製造外掛CT Gen (Citygen)

(圖片 轉載自原作者網頁: http://ch.miaux.free.fr/ct_desc.html)


無意間發的的免費外掛 在C4D當中有Citigen 現在3ds max也有類似功能的外掛了----名叫CT Gen

作者是...很抱歉我還沒查到 因為網頁是法語. 對這個外掛有興趣的可以點這裡觀看與下載. 會法語的人 麻煩教一下網頁在寫什?

我現在是還沒弄懂啦 雖然有法翻英的翻譯(Google Toolbar) 但是還沒上手. 但是想一想如果用外掛 結果只是建立如此簡單的城市 還不如自己用scatter 手動建立建築物 不是嗎?

[相關文章]
Procedural Modeling of Cities程序性產生城市的3D模型與材質

2006/09/19

[教學][影片] 用仙女棒寫字sparklers


很早以前網路上就有人介紹 用仙女棒寫字 想說在3ds max當中是否能達到相同效果呢?

這個教學 教你用Particle Flow 與免費的外掛Trail 3.0建立仙女棒的效果.

下載Trail 3.0 請點這裡. 或是到MAX plugins.de網站搜尋.

製作手寫效果如果你有FreeHand Spline 1.5 maxscript會比較方便些. 你可以到Scriptspot 網站下載.

關於仙女棒的照片 你可以到Flickr istockphoto. (關鍵字: sparkler writing, sparks, sparkers)


教學影片(全長 53分, 分成兩個影片)


相關參數設定請參考:Trail 3.0設定

Particle Flow設定


連結:
中國人在世界兒童運動會上強奪我國國旗

請問你要加入天使隊嗎?

[tutor][video]Sparkler writing in 3ds max with Trail 3.0


[link]China officals grabbed Taiwan's flag during ICG (video)

This video tutor I demo you how to make sparkler writing in 3ds max with Particle Flow with Trail 3.0 plugin. Some video post in Photoshop.

To download Trail 3.0 plaease click HERE (for 3ds max 7) or go to MAX plugins.de to search for Trail. This plugin is create by Pavel Kuznetsov, more information on his hompage.
To make handwriting in 3ds max eazyier, you can download FreeHand Spline 1.5 maxscript on Scriptspot website.

For images reference, you can go to Flickr or istockphoto. (keyword: sparkler writing, sparks, sparkers...etc.)

Video tutorial (total 53mins long, split into two videos)


Parameter settings

Particle Flow

Trail 3.0

More tutorials:
breasts bounce simulation by using blubber 1.0 Maxscript (hot!)

Kamehameha! Dragonball-like effect by using Reactor and Ragdoll Maxscript

Marilyn Monroe-style blow skirt---tips when working with Reactor Cloth

faking human motion with ragdoll maxscript (hot!)

Modeling with Reactor

Ultra fast female modeling with Character Studio

Kienzan! Dragonball-like effect part 2

Ultra-Fast series: texturing a female model

Modeling a croissant

Ultra-Fast series:rigging a female character

2006/09/16

[筆記]本站訪客國家分布有些改變country share


自從到全球各大CG論壇網站積極宣傳侯後 特別是在CGTutorial網站 放置教學後 本站的訪客國家分布有了結構上的改變 美國占了大多數 因為美國是全球CGI產業的頂尖國家 所以這代表本站的內容更加受到肯定. 本站也將積極提供進階高品質的教學服務.

排名: 美國 日本 台灣 加拿大 西班牙 中國 南韓 波蘭 香港 德國 哥倫比亞...

[連結]本站在CGTutorial的教學 01 ,02, 03, 04, 05, 06
(請幫忙投票 感謝大家)

2006/09/15

[筆記]Vue 5與Bryce 5 地形建模功能比較terrain modeling

比較兩大地形建構軟體Vue5與Bryce5 這個比較不會像軟體販售商那樣寫一大堆沒重點又不痛不癢說明. 軟體都有很多功能 本篇主要在介紹地形模型的創造.

Bryce 5 價格: 目前不到台幣1萬元 算是相當便宜


圖一. BRYCE 5 基本地形-1
BRYCE 5創造地形有很多種參數 跟Vue 5比起來 Vue真是太過陽春了. 比較起來Bryce的地形創建功能更強大 也更真實. 例如圖一 左起上排第二張圖 是mud cracks製作龜裂的泥土 Vue就無法直接做到這樣的地形. Bryce還能做到其他像是Cystalline 或是Lava火山的地形 既精確又寫實.


圖二. BRYCE 5 基本地形-2
這裡我最喜歡的是ridegs的地形類型. 像這樣的寫實地形 Vue根本做不出來.


圖三. 修改功能
創造完了地形 還可以修改地形 這裡介紹幾個比較特別的. 我最喜歡的是eroded侵蝕效果. 因為Bryce的eroded效果相當不錯 比Vue要更寫實. 製作流水刻痕相當實用. 另外像是Sawtooth製作地面分割的效果. 而Posterize就是photoshop當中的海報化效果 用來製作梯田很方便.


圖四. 修改的介面
這就是圖三說明的介面 功能很多 不一一說明. 我在圖三把一些比較明顯的修改效果都介紹了. 其他的一些修改效果 老實說並不明顯.


Vue5 價格: 台灣沒有在賣 大約台幣2萬元. 要說明的是 Vue具有Ecosystem生態系統 這是該軟體最大賣點 這套軟體被用在電影 神鬼奇航的製作. 所以相對上價格高也是合理.


圖五. Vue 5地形的創造.
這裡我不是厚此薄彼 特別優待Bryce 5. 看看Bryce我用兩張圖介紹 這裡卻只用一張 就可以知道Vue 5在創作地形上有多麼的陽春. 我只把有明顯不同的地形放在這裡. 其實我認為Vue 5的命名方式非常名不副實 例如iceberge冰山地形. 根本就是一座山把山頂銷平而已. 如果真的要做一個鐵達尼號撞冰山 這個地形還真是沒用又騙錢. 再來Cryan 大峽谷地形 也是 根本就是posterize而已 實在是不夠寫實. 而Vue 5具有dunes沙丘地形 很奇怪它的沙丘就只有單向的. 跟Bryce的dunes比起來 真是不夠寫實也不夠實用. 如果你要做一個沙漠場景 Bryce的dunes可能會比較接近. 為一個優勢是Vue 5能夠製作彈坑craters, 隕石坑的效果 還有能放置石頭等.


圖六. 修改的功能
修改的功能基本上該有的都有只是比不上Bryce的介面(我比較喜歡黑白的地形). 也不夠寫實實用. 具有erode: wind風化效果 只是這樣的特效也不如描述般的結果.


結語:
兩套軟體都能輸出地形到3ds max. 我個人偏好Bryce 感覺上Bryce比Vue的地形方面專業許多. 只是在整合上與植物分布(Ecosystem)上比較方便. 希望軟體開法者能夠整合兩者的優勢.

[相關教學]
用Vue製作島嶼教學影片 (New!)

[連結] Vue 6的軟體功能展示影片
[連結] Bryce 5.5 軟體販售網站

[off-topic]Cultural Revolution in Taiwan

Detail: please search keyworlds for Shih Ming-teh or Ma Ying-jeou

2006/09/13

[筆記]義大利麵店的燈飾lights in a spaghetti restaurant


在台北一家義大利麵店看到燈飾 覺得很簡單也很美 於是就做成3D的樣子.

軟體: 3ds max 7, Finalrender stage 1, Photoshop 5

2006/09/12

[教學][影片] 免外掛 建立真實的玻璃破裂效果

教學結果 或GIF

雖然有個外掛叫做Blast Code能夠做出真實的爆破玻璃效果 但是只支援Maya. 這個教學教你使用一張照片(破窗)轉成向量檔(AI) 轉入3ds max當中 建立破窗. 使用eidtmesh將各個elements轉成一個一個碎片. 利用Reactor模擬動作.

最後給予Gradient的透明貼圖 做出裂痕增長的效果. 要增加更真實的效果可以再建立粒子系統.

教學影片(28分鐘):


註: 我使用Adobe Streamline將圖檔轉成向量檔(*.ai). 如果沒有此軟體 可以利用Bitmap to Vector關鍵字找免費的軟體. 圖片建議至istockphoto找.


[連結]世界兒童運動會中國強奪台灣國旗

[tutor][video]making a broken window without using a plugin

Tutorial result or click HERE (GIF):


Although in Maya, there are commerical plugin like Blast Code, can make realistic windows cracks, however the Blast Code plugin don't have max version. In this video tutorial I demo you how to use a photo of broken window, convert this bipmap to raster file (in AI format) and import this raster file in 3ds max. Base on the raster file (Adobe illustrator, *.ai) model a broken window.

Video tutorial (28mins long)


Breif description:
First use: cracks, broken windows plus bullet to search images for this tutorial. You can find some useful images on istockphoto. I use the Adobe Streamline 4.0 software to convert a bipmap to raster format. If you don't have Streamline, try google by using "Bitmap to Vector" search for freeware. After you download an bitmap image of broken windows, edit it in photoshop make it suitable for conversion.

In 3ds max imoprt the raster file (*.ai) of your broken windows, using xform to scale it up and apply a extrude modifier. Convert to editmesh, in editable mesh, select all element and explode (set the angle to 180). Select all objects and apply a Reactor...I skip this part, plz read my other tutor on this site.

Finally, apply a gradient map(set to radial tye) to oppacity slot. By animating the color #2 and color #3, you can faking a growing cracks of the window.

To make it more real, add an Superspray particle, adding debris for the breaking glasses.

[more tutor]
faking human motion with ragdoll maxscript (Hot!)

Discussion thread on 3dbg.com (Russian site), thanks Osko!
[off-topic]


2006/09/10

[資源]免費的LED顯示面板 外掛electronic display

klanky網站提供 (就是那個提供Greeble外掛的網站啦)

以後要做計算機的螢幕 或是火車站滾動的LED燈(應該不支援中文) 都可以做囉!

[資源]城市製造的軟體

MetroModeler 軟體. 美金500元. 這是我夢想出現的軟體 但是效果好像並不好 不夠真實. 聽說電影金剛的紐約城市 也是用軟體產生的. 但那沒有拿來販售.

2006/09/09

[筆記]photos took in Taipei MRT, Jiantan station 今天在捷運劍潭站拍攝


第一張是站在靠銘傳大學那一側的人行道 往上拍攝劍潭捷運站 (Jiantan station)的人潮 當時天色昏暗 很適合拍攝剪影. (用photoshop調過) 第二張是附近路邊的小花.

使用Panasonic NV-GS300數位攝影機拍攝 真是一台便宜又大碗 好用的DV啊! 謝謝日本人 Thank you Japanese!

Thank you support CG Taiwaner 感謝各位支持本站!

CG Taiwaner have 6224 visitors since July 27, 2006.
本站自七月以來已有6224位訪客

Thank you all support this blogger around the world, especially friends in Jpan and the HALLUCINO (maxuser) website.
感謝全世界的朋友們支持本站 特別是日本的朋友與 HALLUCINO對於本站的支持


Thank you very much! ありがとう
非常謝謝您!

2006/09/08

[off-topic]China officals grabbed Taiwan's flag during International Children's Games

detail click HERE

[video][tutor]Modeling a croissant 牛角麵包建模篇


Croissant is one kind of French bread. There are many difference kind of croissants. This tutor demo you modeling a croissant (a Taiwan style croissant) with several basic modifiers include: loft, taper, FFD4x4x4, symmetry, push, melt,noise and meshsmooth. Plus use the Advanced Painter maxscript to scatter the sesmes on the croissant.

This tutorial is very basic and easy, good for beginner in 3ds max, I hope you like it.

video (total 17mins long)
Click HERE


What is Taiwan's stye croissant?
click HERE see the images

[More Tutorial]
AI implant Quickstart (simple crowd simulation) (New!)

2006/09/07

[資源]這期2006.9月份 美國科學人雜誌介紹3D動畫

科學人雜誌網站(中文)


兩個專欄介紹3D動畫 有興趣可以去書店翻翻 (以下摘錄自科學人網站)


【資訊科技】
更順暢的3D動畫 撰文/吉布斯(W. Wayt Gibbs)

想要有畫面逼真、影像品質直逼電影的3D電玩遊戲嗎?改良過的繪圖處理器讓這一切成為可能。

【資訊科技】
改造繪圖處理器 撰文/曾尚文

2006/09/05

[tutor][video]Kienzan! Dragonball-like effect part 2


Tutorial result:


Hi all:

I made this video tutorial to mimic the Kienzan(気円斬)---special ability of Kuririn (クリリンの必殺技) in Drgaonball manga. This tutorial is very easy, good for beginner and interesting.


related video about Kuririn on Youtube:
1. DBZ AMV: "Hohoemi no Bakudan (remix)"
2. Die Kuririn!!!

Video tutorial (total 18mins long, split into two videos)
video 01
video 02

Brief description about this tutorial:

First posing the character to a desired pose. Create several simple objects. Convert those objects to editable poly and use slice tool to slice them. After you slice the object, detach into two pieces. Apply each pieces a cap holes modifier. Run reactor simulation of each object (one at one time). For the Razor (Kienzan), it is a simple sphere and use path constraint to make a moving Razor.


[related topic]
Kamehameha! Dragonball-like effect
Modeling a bottle of laundry detergent (New!)

[off-topic]
China officals grabbed Taiwan's flag during ICG

(Dragonball, Kienzan and Kuririn belong to their company, if they don't want me to do this, I will remove this page right away)

2006/09/04

[筆記]比基尼泳裝美女(lowpoly系列)


由裸女加上貼圖材質 希望有夏天的感覺

[資源]兩本全華出版社的翻譯書: 3D人體模型與動畫, 3D電腦動畫及數位特效


最新出的翻譯書 很不幸的我已經有了原文書了(很貴 每本上千元)


相對來說中文翻譯書就很便宜了 這兩本書都是非常好的書, 3D人體模型與動畫 這本作者是製作裸女的權威, 另一本 3D電腦動畫及數位特效 是對動畫一般性的介紹.

對於動畫有興趣的人 推薦這兩本 不會讓你浪費錢的.

2006/09/01

[video][tutor]Ultra fast female modeling with Character Studio


Lazy to model a female from scrach? This tutorial demo you model a feamle from Charater Studio Bones within one hour! Easy polygon modeling, good for the very beginger in 3ds max.

video tutorial (total 1h 7mins long, split into 4 video files)
video01
video02
video03
video04
Brief description of this tutorial:
Fisrt create a feamle biped. Load up an image reference.Change proportion of each bones. Convert each bone to editable mesh, delete the faces you don't need. Convert to editable poly. Attach bones and use "taget weld" to weld the vertex. Cut face if necessary.

Finished model with pose and texture:


More video tutorials:
Ultra-Fast series: texturing a female model

Marilyn Monroe-style blow skirt---tips when working with Reactor Cloth

faking human motion with ragdoll maxscript (Hot!)

lights in a spaghetti restaurant

NURBS modeling a PET bottle

Making of canvas shoe (NURBS)